Java ME, A mobile Rubik’s Cube Timer
Posted: July 6, 2008 Filed under: Rubik's Cube Timer Program for Mobile Devices | Tags: Cube, J2ME, jad, jar, Java, Java ME, Midlet, mobile phone, mobile timer, program, rubik's cube, Rubik's Cube Program, Scrambler, speedcubing, Timer 25 Comments
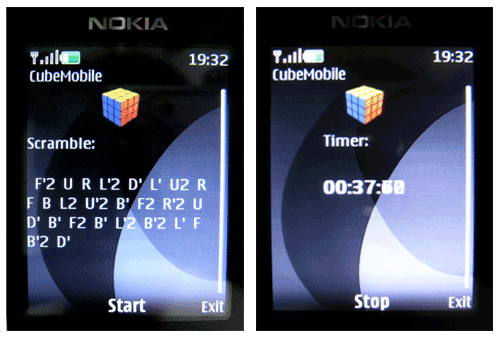
So here’s my first MIDlet or mobile java mobile edition program for mobile phones. I wanted to have a Rubik’s Cube scrambler and timer application on my phone so I could cube on the road. It’s very basic and doesn’t include a database with highscores and averages maybe I’ll include that in the future.
You can download the application here (rightclick, /saveas): http://taggle.110mb.com/CubeMobile.jar
——————————————————————————————————————————————–
Update 1: ‘Whoops’
Someone pointed out the scramble function had a flaw (making neutral moves), heres the corrected version:
http://taggle.110mb.com/CubeMobile1.2.jar (right-click, /save as)
Thanks for trying it out, over 900 downloads. I wrote this program because I couldn’t find one, perhaps by now there are good timers for the phone out there. If so leave a link in the comments!
——————————————————————————————————————————————–
Java Midlet, writing your own mobile phone programs
Posted: July 3, 2008 Filed under: Java Midlet Mobile Programs | Tags: Eclipse, invalid application, jad, jar, Java, Java Wireless Toolkit, Midlet, mobile phone, Netbeans, nokia 3 CommentsSo after 8 years of walking with the same old mobile phone (back then the life cycle of phones was longer 😉 ) it was time for a new one, the Nokia 6500. A world of difference but I have to say its easy to get used to a color screen, camera, build in mp3 player and ofcourse the java games!
I like the idea you can write your own programs on your phone, adds an extra dimension of control! So I downloaded the Java Wireless Toolkit (2.5.1.) because of the platform you can’t write normal java applications but you have to write MIDlets (basically a stripped down / lean version of Java Virtual Machine) since you are not writing for a pc but a cellphone (although that difference is fading rapidly).
I also tried development environments like NetBeans (like the visual approach) and Eclipse for mobile applications but really all you need to begin and what I am using is
(1) notepad and (2) JWT (Java Wireless Toolkit)
then follow this
(3) quickstart: http://developers.sun.com/mobility/midp/articles/wtoolkit/
and look then at the code of this
(4) example: http://developers.sun.com/mobility/midp/articles/getstart/
I had some trouble after having packeged (Project/package/create package) my program into a jar file it would say ‘invalid application’ on my phone. This had to do with the API platform selection which was set on MIDP2.1 but my phone only had support up to MIDP2.0, so after changing that option (under custom packaging options) it would run like a charm!
<This post is a work in progress>
Solving the 3×3 Rubik’s Cube
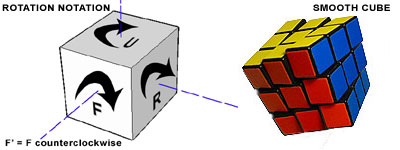
Posted: February 8, 2008 Filed under: How to solve the 3x3 Rubik's Cube | Tags: algorithm, cubing, fridrich method, how to, rubik's cube, solve, solving, speed cubing, tutorial 3 Comments- Form the cross on the bottom layer, matching the edge color to both the bottom and the side middle cube. This step is intuitive and gets faster with practice.
- Hint: the center cubes are fixed, so its all rotational movement. Also: don’t be afraid to rotate a solved part out of the way, in order to get another piece correct. Just make sure to move it back afterwards.
- Pair the bottom corner with the correct edge of the 2nd layer on the top layer and then slot it in the correct place
- This can be done intuitively solving the first two layers at the same time this in combination with the cross in step 1 is called the Fridrich Method / Fridrich F2L tutorial vid
- Or by first placing the bottom corner correctly and then placing the edge using one of the following algorithms:
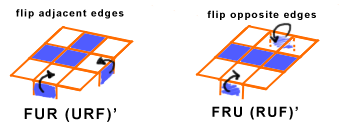
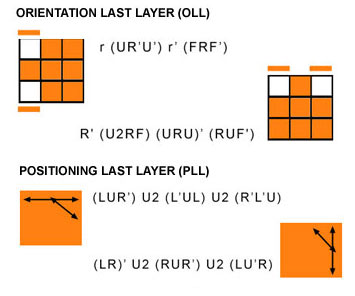
- Orientation Last Layer (OLL) Goal is to form the cross on the top layer, depending on the starting position use the following algorithms. If you don’t have one of the two patterns as starting position perform one of the two algorithms to flip some edges to get one of the patterns.
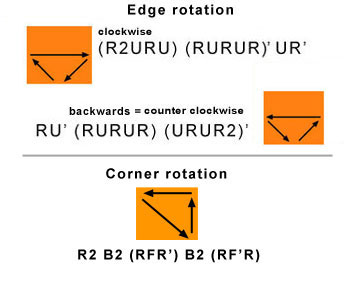
After the cross the goal is to form a fish (flip one corner) and then to turn the 3 remaining corner cubes facing with the correct color up. For that we use the following algorithm that flips the corners as shown in the figure:
Make sure you have the correct side in front of you so that it flips the right colors. First perform it to get 1 corner color oriented correct, forming the fish pattern (cross + 1 corner in the same color) then perform the same algorithm once or twice to get the remaining 3 corners flipped, make sure before performing it to have the right side in front of you.
- Postioning of the Last Layer (PLL), now that all cubes of the top layer are facing the right direction the following algorithms can be used to position the edges and corners correctly. Performing them backwards rotates the cubes the other way around:
- Solved! For more information on how about solving the rubik’s cube, other methods, getting faster, tutorials, mathematics etc. check out the following pages:
great site with lots of tutorials, video’s, tips and tricks!equally great site with focus on understanding the cube in order to solve ityou can find lots of video tutorials here! ( I recommend this beginner video click )check how fast you really are!
- Recognize patterns. Going slower makes you faster, because in the beginning this takes time but once you got them this skill makes you faster.
- Plan ahead. Just like you decide which move to make in chess by looking ahead for the best outcome, with cubing you are looking ahead for the least amount of moves to get you to a solved cube. For example whilst deciding on the moves of the cross choose the moves that help you set up for an easy f2l solve.
- Memorize color locations. Since the center cubes are fixed it also helps to memorize their locations at any given orientation so that you won’t have to turn the cube (= time consuming) while solving.
- Be flexible. This is just one method to solve the cube, check out others which can be completely different or combinations of different techniques. Knowing different techniques enables you to switch to the fastest method/strategy during solving.
- Practice practice practice!
Converting your Vinyl / LP’s to CD
Posted: August 19, 2007 Filed under: Converting vinyl/LP to CD/MP3 | Tags: CD, converting LP to CD, digitalizing, how to, LP, mp3, recording, tutorial, Vinyl 5 Comments
Step 1: Equipment
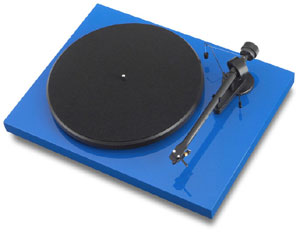
I used a debut Pro-ject Debut III with build in pre-amplifier. The sound quality of the debut is very good especially for the price at which is offered. If you want better sound quality you would have to exponentially increase your budget.
For digitalization I used my laptop with an external USB sound card, in this case the Imic, but any external card would suffice. The reason its external is because my line-in of my laptop performed very poor and was subject to internal electronic interference.
The LP’s itself I cleaned with using a micro fibre cleaning cloth wetted with an mixture of 25% Isopropyl alcohol and 75% distilled water which you can acquire separately at your local drugstore or supermarket. Make sure to go over the LP in a circular motion. This worked well since my LP’s were relatively in good condition. If they are really dirty you should consider submersing the LP and playing them wet.
Step 2:The software
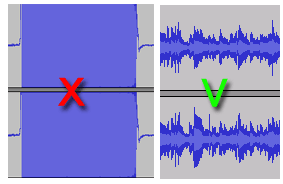
For recording I used the open source program Audacity, recording to WAV 16bit PCM. Be sure to set the record level (windows/configuration/sound) of the line-in just high enough without peaking (hitting 0 dB) which results in distorted sound.
You will notice some hiss and clicking in your record. If you can live with it or even like the authentic sound you should leave it since any tampering with the sound will always be at best an approximation and at worst degradation or deletion of sounds. However I decided to put a mild reduction of hiss and click with a minimal trade off of reduction in sound fidelity/quality.
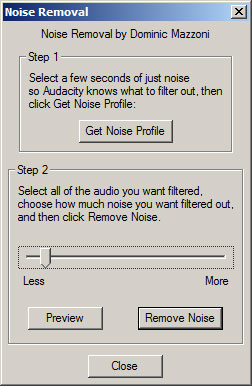
After saving the recorded wav file I used Click Repair to remove the clicks and pops. Of all the programs I tried this one was the best in removing pops and clicks while maintaining sound quality. After removing the pops and clicks I opened the .wav file in Audacity which has a nice feature called Effect/Noise Removal. First select a part with noise/hiss in it, the best is to take the transition part between two tracks. Then go to Effect/Noise Removal and click ‘Get Noise Profile’. Then select the complete recording (select all) and adjust the slide bar to the lowest ‘less’ as shown in the picture:
Any higher will to my opinion ruin the quality significantly. Be sure to first remove the pops and clicks and then remove the hiss/noise. The other way around will result in lower sound quality.
After that you can split the recorded LP and export to multiple tracks as explained >here<.
If you have any comments or recommendations please leave a comment below!
